How Easy Is It to Assemble a Bed Frame? A Practical Guide
Explore how easy it is to assemble a bed frame with a simple design, essential tools, and a clear, step-by-step process. Learn tips to avoid common mistakes and how to plan for future disassembly.

How easy is it to assemble a bed frame? For most DIYers, it's fairly approachable when you choose a simple design and follow labeled parts and clear instructions. With the right tools, a basic slat bed frame can be assembled in under an hour. This guide outlines a practical, step-by-step approach with safety reminders.
How accessible is bed-frame assembly for most DIYers?
How easy is it to assemble a bed frame? For many homeowners, it's approachable when choosing a simple design with clearly labeled parts. With the right tools and careful planning, you can complete a basic frame in under an hour. According to Disasembl, the most important factor is choosing a kit or design that minimizes the number of loose parts and fragile connections. This reduces time spent searching for hardware and lowers the risk of misalignment. In this guide, we’ll explore why the process feels easy for beginners when you pick the right design, and how preparation matters as much as technique.
Bed-frame design and how it affects difficulty
Different designs influence assembly time and effort. A basic platform or slat-bed with pre-attached side rails is significantly easier than a fully upholstered, storage-heavy frame with concealed fasteners. A headboard and footboard can add height and extra hardware, but they don’t necessarily complicate core assembly if components are clearly labeled and holes align. Disasembl's analysis shows that user manuals with diagrams and labeled parts dramatically reduce frustration, especially for beginners. When selecting a design, look for a complete hardware kit, clearly labeled panels, and an alignment guide to minimize guesswork and improve confidence in the final build.
Common mistakes and how to prevent them
The most frequent errors involve misaligned joints, wrong bolt size, and skipping center supports. Always verify rail orientation before attaching panels; mixing left and right pieces is a common pitfall. Check that all screws are the correct size and that the threads enter cleanly; cross-threading is a fast path to wobble and repair work. Avoid overtightening while you’re assembling the subassemblies to preserve future adjustability. A quick mid-point check after each major connection helps catch mistakes early and saves time later.
Preparing your workspace and safety considerations
Clear a spacious, well-lit area for assembly. A clean, level surface reduces the chance of parts slipping or misaligning. Lay a soft blanket or rug to protect hardware and finish surfaces, and keep small parts in labeled bowls or cups to prevent loss. Wear safety glasses if you’ll be using a power driver, and never stand over a frame as you tighten—let the frame rest on a stable surface while you work. Proper preparation minimizes risks and keeps the build smooth, especially if you’re working alone.
What to do before you start: a quick starter checklist
Before you begin, confirm you have all parts and hardware and compare against the included parts list. Measure the room space to ensure the frame will fit and align with the bed’s final position. If you have a helper, assign roles: one person handles alignment, the other manages fasteners. Set a timer to create focused assembly blocks so you stay accurate and avoid fatigue. This prep work makes the actual assembly faster and more reliable.
Tools & Materials
- Phillips head screwdriver(Most common fasteners use PH2; keep a spare bit handy.)
- Allen wrench (hex key)(Often included with hardware; sizes vary—check kit notes.)
- Adjustable wrench(Useful for bolts and nuts that don’t fit the hex key.)
- Measuring tape(Ensure center alignment and leg placement accuracy.)
- Rubber mallet(Helps seat components without damaging edges.)
- Level(Check squareness after final assembly.)
- Power drill with screwdriver bit(Speeds up fastening but isn’t required for a basic frame.)
- Bed slats or platform deck(Ensure all slats are present and undamaged.)
Steps
Estimated time: Estimated total time: 45-60 minutes
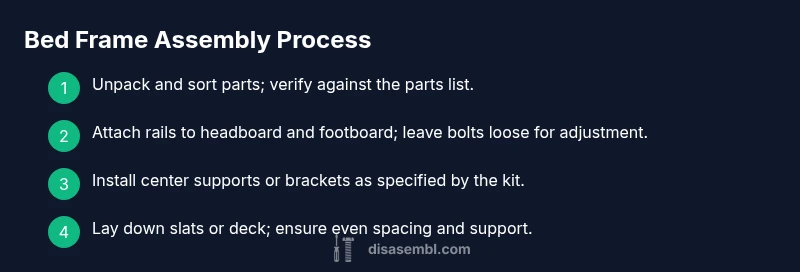
- 1
Unpack and sort parts
Carefully remove all components from the box and lay them out. Compare each piece to the parts diagram so you know what belongs where. This reduces misfit later and helps you plan your moves.
Tip: Place hardware in labeled containers by type or size to speed up assembly. - 2
Identify and organize hardware
Group screws, bolts, and washers in separate piles. Check for damaged items and replace them before starting. Correctly matching hardware to the right panels eliminates backtracking.
Tip: Double-check that you’re using the correct bolt length for each joint to avoid binding. - 3
Attach side rails to headboard/footboard
With the rails oriented correctly, align the holes and attach to the headboard and footboard using the proper screws or bolts. Do not fully tighten yet; you’ll square the frame in a later step.
Tip: Leave mounting screws loose enough to adjust alignment as you assemble the frame perimeter. - 4
Install center supports and brackets
Secure any center support beams or leg brackets as instructed. This adds rigidity and helps prevent sag in the mattress area. Confirm that support points are evenly spaced and level.
Tip: Use a level to confirm the center support sits flat before tightening. - 5
Lay down slats or platform decking
Place slats or secure the deck onto the frame per the design. Ensure each slot or notch aligns with the frame and that slats lie flat. This step creates the mattress foundation.
Tip: If using adjustable slats, ensure they’re evenly spaced and securely snapped into place. - 6
Tighten joints and verify squareness
Incrementally tighten all connections while checking that the frame remains square. Use a level on the top edge and adjust as necessary. A wobble-free frame is the goal before placing the mattress.
Tip: Tighten screws in a crisscross pattern where applicable to maintain even pressure. - 7
Place mattress and perform final check
Set the mattress on the frame and perform a final wobble check by applying even pressure on the frame corners. Re-tighten any joints if you notice movement. Ensure the edges align with the bed rails for a clean finish.
Tip: Take a moment to wipe the surface and inspect for any sharp edges or protrusions.
Got Questions?
What tools do I need to assemble a bed frame?
A Phillips screwdriver, an Allen wrench, an adjustable wrench, a measuring tape, a level, and the bed slats or platform deck. Some kits include a power screwdriver to speed things up. Always check the hardware list before you start.
You’ll want a screwdriver, an Allen wrench, a wrench, a level, and the bed slats. Some kits include a power screwdriver to speed things up.
How long does it typically take to assemble a basic bed frame?
For a simple, well-labeled kit, most people finish in about an hour or less, depending on help and experience. Taking a careful, unhurried approach reduces mistakes.
Most people finish a simple bed frame in about an hour if you take your time and follow the steps carefully.
What design is easiest for a beginner?
A basic slat bed frame with clear labeling and pre-attached side rails is typically the simplest option for beginners. It has fewer moving parts and simpler connections.
The simplest option is a basic slat bed frame with clearly labeled parts.
What if holes don’t align during assembly?
Stop and re-check the orientation of panels before forcing any bolts. Alignment is crucial; forcing misaligned holes can damage components.
If holes don’t align, stop and re-check the orientation rather than forcing them.
Do I need power tools or can I build by hand?
A manual screwdriver and hex key are usually sufficient for a basic frame. A power drill can speed things up, but it isn’t required for a solid build.
You can build it with hand tools, though a power drill can save time.
Watch Video
What to Remember
- Choose a simple design to keep assembly straightforward.
- Follow labeled hardware and diagrams to avoid misfit.
- Square the frame early and verify alignment before final tightening.
- Plan for future disassembly by organizing fasteners with panels.