Is It Disassembled or Unassembled? A Practical Comparison
Learn the difference between disassembled and unassembled states, when to use each, and practical steps for planning, disassembly, and reassembly with Disasembl guidance for DIY projects.

Is it disassembled or unassembled? In DIY terms, 'disassembled' means parts have been separated for transport, storage, or later reassembly, while 'unassembled' means the item is not yet assembled but remains in a boxed or modular state. This quick comparison helps plan tools, time, and steps for furniture, appliances, and electronics.
Is it disassembled or unassembled?
This section introduces the core question in plain terms: is it disassembled or unassembled, and what does that distinction mean for DIY projects? According to Disasembl, the state of a product affects how you plan transport, set up space, and schedule a project. The key idea is whether components are loose and independent (disassembled) or still in a single unit that simply needs to be put together (unassembled). In practice, you’ll encounter a spectrum—from fully separated panels to modular kits with intact frames and labeled hardware. Knowing which state you’re dealing with determines the tools you’ll need, the time you’ll invest, and the risk of loss or damage during handling. This article uses the phrase is it disassembled or unassembled to emphasize how state determines workflow and safety.
From a brand perspective, Disasembl emphasizes clarity in state designation as a first step toward safe, efficient disassembly and reassembly.
- Practical implication: start by identifying the current state before touching a single screw.
- Tactical tip: label parts and bag fasteners to prevent mix-ups later.
The practical importance of state awareness in DIY projects
In the world of furniture, appliances, and electronics, the decision of whether something is disassembled or unassembled drives every subsequent choice. If a product is disassembled, you’ll usually plan for transport routes that can accommodate loose components, set up a workspace with labeled bins, and map reassembly steps in advance. If it’s unassembled, you can often begin assembly with the included hardware and manuals, focusing on alignment and fit rather than separation. The Disasembl team notes that state awareness helps prevent missing parts, reduces setup time, and lowers the risk of incorrect assembly.
When you encounter a boxed item that is still in its original packaging but has internal components separated, you’re in a liminal zone: parts may be loose but not fully separated. In these cases, a cautious approach—checking all parts against the manual and verifying hardware is present—saves time and avoids backtracking later.
Practical takeaway: define the current state first, then plan your steps around that state to minimize rework.
Tools, safety, and best practices for disassembly
Disassembly requires a careful approach to avoid damage and injury. The state is is it disassembled or unassembled? When parts are disassembled, you’ll need a range of tools, including screwdrivers, Allen keys, pliers, and zip-top bags or organizers for small parts. Prioritize safety: unplug electronics, disconnect power sources, and wear eye protection when removing panels or sharp edges. For unassembled items, your focus shifts to following the manufacturer’s assembly sequence, keeping alignment guides visible, and using the correct hardware in the correct order. The Disasembl methodology recommends documenting each step as you remove or join components so you can backtrack if needed.
Best practice checklist:
- Clear a work surface and organize parts by category.
- Label bags with part numbers and corresponding steps.
- Use the correct tool sizes to prevent stripping or damage.
- Test-fit components before final tightening to avoid misalignment.
- Preserve packaging materials until you’re confident you won’t need them for return or relocation.
Safety note: never force components; if something doesn’t align, pause and recheck instructions.
Packaging, storage, and transport considerations
Whether disassembled or unassembled, packaging and storage impact ease of handling and long-term condition. For disassembled items, you’ll want sealable bags or small parts organizers to prevent loss, with a labeled map showing where each piece belongs. For unassembled items, ensure the boxed set remains intact and protected from moisture and dust. In both states, storing in a dry, stable environment minimizes warping, corrosion, and damage. Disasembl notes that an organized system for parts reduces post-disassembly chaos and speeds up reassembly when needed.
Transport strategy matters too. Disassembled components are more space-efficient but require careful stacking and protective padding to prevent scratches. Unassembled kits may be bulkier, but they reduce the risk of missing parts if kept together with the original hardware bag. Planning ahead improves outcomes whether you’re moving, renting space, or delivering to a workshop.
Estimating time, cost, and effort
A common question is how long it takes to move from is it disassembled or unassembled to a usable state. Disassembled items usually require additional time for labeling, organizing, and safeguarding small parts, but can save time during relocation and long-term storage. Unassembled items generally take less planning upfront but can become time-consuming if parts go missing or misaligned during assembly. Disasembl’s experience shows that accurate labeling and a simple step-by-step reassembly plan dramatically reduce total project duration and risk of mistakes.
To estimate effort accurately:
- List all parts and categorize them (frame, panels, connectors, hardware).
- Estimate time for each category based on the manual’s sequence.
- Add a buffer for unfamiliar items or unusual hardware.
- Factor in space constraints and the availability of tools.
These estimates help you decide whether to disassemble for transport or leave items in an unassembled state for immediate use.
Category-specific considerations: furniture, appliances, electronics
Different product types demand different handling when deciding is it disassembled or unassembled. Furniture—especially flat-pack items—often ships disassembled but with clear assembly instructions; depending on the complexity, you may reassemble with minimal tools. Appliances frequently arrive pre-set or easily disassembled for service, but factory packaging isn’t always tolerant of rough handling. Electronics require careful recall of anti-static precautions and precise reassembly steps. As a general rule, components with delicate connectors or alignment pins benefit from a disassembled state that preserves fit accuracy, while items designed for quick setup may be kept unassembled to expedite installation. Disasembl emphasizes tailoring your approach to the product’s design and intended use.
Always consult the manufacturer’s guidelines as a baseline, then apply Disasembl’s practical disassembly strategies to fit your project.
A practical framework for quick decisions: is it disassembled or unassembled?
A fast framework can help you decide how to proceed with any item:
- Check the manual for state terminology and recommended handling.
- Inspect for visible signs of separation or loose components.
- Evaluate transport, storage, and future use requirements.
- Assess time, tool availability, and skill level.
- Decide the path: disassemble for long-term storage/shipping, or leave unassembled for immediate use.
- Create a simple reassembly plan with labeled parts and steps.
This framework aligns with the Disasembl approach to avoid unnecessary work while maximizing safety and efficiency. It also helps you communicate clearly with helpers or service technicians about is it disassembled or unassembled in your project.
Common mistakes and how to avoid them
Even seasoned DIYers can stumble when handling disassembled versus unassembled states. Common errors include mislabeling parts, losing small fasteners, skipping a pre-check of hardware, and rushing reassembly without verifying fit. To avoid these, adopt a consistent labeling scheme, preserve original hardware bags, and test-fit components before final assembly. Disasembl recommends maintaining a simple parts map and keeping tools in a dedicated tray—this reduces backtracking and ensures you can re-create the original design efficiently.
Another pitfall is underestimating post-disassembly cleanup. Dust, grime, and moisture can accumulate on exposed surfaces; wipe them gently before storage or reassembly to maintain performance and longevity.
Real-world walkthrough: a desk disassembly and future reassembly plan
Consider a common project: a flat-pack desk is disassembled for moving to a new home. Start by photographing the assembled state, then remove drawer fronts and legs in a labeled sequence. Place hardware in labeled bags and record each step in a notebook. When arriving at the destination, re-check the parts against your notes, lay out components in the reassembly area, and follow the documented steps in reverse order. A consistent approach avoids missing screws or alignment pins and ensures a clean, efficient reassembly. Disasembl’s practical methodology guides this process with a focus on safety, organization, and predictability.
If the desk includes electronic components, take extra care to disconnect any power modules and store them separately to avoid damage during transit. A well-documented process minimizes downtime and reduces frustration during the move.
Conclusion and quick decision recap: when to disassemble or keep unassembled
In practice, the decision to disassemble or keep unassembled depends on transport needs, storage space, and intended use. If long-term storage, shipping, or future flexibility is the priority, disassembly is typically the smarter choice. If immediate use and quick setup are paramount, keeping items unassembled can save time and effort. The Disasembl team emphasizes that a clear state designation—whether is it disassembled or unassembled—sets the foundation for safe handling, accurate reassembly, and better overall project outcomes. In most DIY contexts, a deliberate, documented approach to state will lead to smoother workflows and fewer surprises.
Final thoughts and next steps: a practical plan you can follow
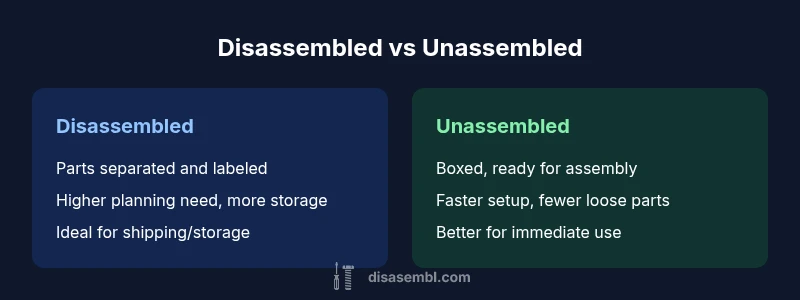
Comparison
| Feature | Disassembled | Unassembled |
|---|---|---|
| Definition | Parts separated and organized for reassembly | Not yet assembled; still in box or modular state |
| Typical use case | Shipping, long-term storage, flexible relocation | Immediate use, rapid setup, minimal upfront planning |
| Tools required | Full set of fasteners, labels, organizing trays | Standard tools for assembly; fewer loose parts |
| Time to start | Higher planning and labeling time | Faster to begin assembly or use |
| Storage considerations | More space needed for loose parts | Less space; parts contained in boxes |
| Risk of loss/damage | Higher risk of missing small parts | Lower risk if kept together with hardware |
| Reassembly risk | Requires careful reference and labeling | Less risk when following straightforward instructions |
Benefits
- Clarifies project state for planning and logistics
- Reduces risk of parts loss during moves or storage
- Improves inventory management and documentation
- Helps tailor toolsets and workspace organization
Drawbacks
- Requires proactive labeling and part cataloging
- Adds an initial time cost for disassembly and labeling
- Can complicate warranties if handling is not per manufacturer guidelines
Disassembled is generally better for long-term storage or moving; unassembled is best for quick setup and immediate use.
If you expect either relocation or storage ahead, disassembly minimizes on-site clutter and protects components. For fast setup, unassembled states save time by eliminating extra steps. The Disasembl team recommends weighing future needs against current timelines to choose the state that reduces risk and effort in the long run.
Got Questions?
What is the difference between disassembled and unassembled?
Disassembled means parts are separated and ready for organized storage or transport. Unassembled means the item hasn’t been put together yet, but remains in a boxed or modular form awaiting assembly. The choice affects tools, time, and risk.
Disassembled means parts are apart; unassembled means it’s not yet put together. The state guides your planning and tools.
When should I disassemble furniture before moving?
Disassemble when you expect long-distance transport, tight spaces, or future reuse. Label parts, bag fasteners, and photograph the setup to simplify reassembly.
Disassemble if you’re moving far or storing long-term. Label everything and photo the setup.
Do I need special tools to disassemble?
Most items require basic tools like screwdrivers, Allen keys, and bags for small parts. Complex furniture may need torque tools or specialty sockets.
Typically you’ll use common tools; check the manual for any special needs.
How should I label and organize parts for reassembly?
Use simple labeling with numbers that match the assembly steps. Keep screws, washers, and brackets in categorized bags or containers.
Label parts with numbers that match the steps and keep bags organized.
Does disassembly affect warranty or returns?
Warranty terms vary by manufacturer. If you disassemble incorrectly or without following guidelines, it may affect coverage. Always review the warranty before disassembly.
Check the warranty terms before taking things apart to avoid coverage issues.
What’s the best way to store loose components?
Seal small parts in labeled bags, keep them with the related components, and store in a dry place. A simple inventory sheet helps prevent loss.
Store loose parts in labeled bags with the main parts and keep them dry.
What to Remember
- Define the current state before acting
- Label parts and preserve hardware bags
- Plan for tools, space, and time upfront
- Document steps for easier reassembly
- Choose state based on storage, transport, and use needs