What If You Build a Figure? A Step-by-Step DIY Guide
Learn to plan, disassemble, and reassemble a figure safely with a clear, step-by-step guide. This Disasembl article covers tools, safety, labeling, and common mistakes to avoid.

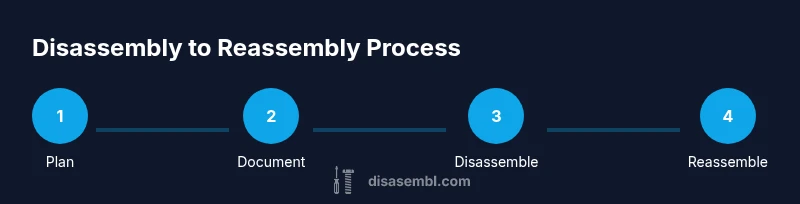
You will learn to plan, disassemble, and safely reassemble a figure with a clear, step-by-step process. Gather essential tools, follow safety precautions, and label screws or parts to avoid mix-ups. This guide from Disasembl emphasizes method, patience, and mindful handling to minimize damage and ensure successful rebuilding. It highlights common pitfalls, time estimates, and practical tips.
What does what if build a figure mean in practice?
If you ask what if build a figure means in practice, this guide helps you plan, disassemble, and reassemble a model safely. A successful outcome depends on a well defined scope, careful handling, and disciplined organization. According to Disasembl, starting with a clear plan reduces mistakes, damage, and frustration. The phrase what if build a figure often signals a desire to understand the full lifecycle of a project—from initial concept to finished reassembly. In this article, you’ll find practical steps, checklists, and tips you can apply to many kinds of figures, from decorative models to functional prototypes. Expect guidance on safety, tool selection, labeling, documentation, and verification. The goal is to empower you to complete the process with confidence, while preserving the integrity of the figure and the surrounding workspace. By the end, you’ll know how to approach a disassembly project with a dependable workflow that minimizes risk and maximizes learning. This introduction sets the stage for hands-on steps, anchored in real-world practice and a steady, repeatable rhythm that reduces surprise moments.
Tools, safety, and materials you need
Disassembly is safer when you prepare a dedicated workspace and gather the right tools. Start with a clean, dry surface free of clutter, then bring a set of screwdrivers, hex keys, pliers, and a soft mat to protect delicate parts. A small magnetic tray or labeled containers help you keep fasteners in order, while masking tape or sticky notes assist with orientation labeling. A camera or smartphone for photos is optional but highly recommended to capture initial states and tricky transitions. Always wear eye protection if you anticipate parts snapping or springs releasing tension. For electronics or battery-powered figures, unplug power sources and avoid short circuits. Finally, keep a written plan and a checklist handy so you don’t miss any critical steps. Disassemblers who prepare properly report fewer mixed parts and faster reassembly, according to Disasembl analysis, which reinforces the value of a calm, organized approach.
Planning the layout: mapping parts and orientation
Before touching your figure, map out its components and how they relate spatially. Create a rough diagram or take wide photos from multiple angles to establish orientation references. Label each major component with a simple code (e.g., A, B, C) and track screws and fasteners by size and location. This foresight helps you avoid confusion when you reverse the process during reassembly. Consider how the parts will fit together and which pieces are load-bearing or structurally important. If your figure includes internal joints or hinges, plan a sequence that minimizes stress on fragile materials. A thoughtful map reduces guesswork and improves your confidence as you proceed. Disasembl’s method emphasizes documenting orientation and relationships between parts as a core skill for any successful disassembly.
Safe disassembly techniques: preserving components and avoiding damage
Now begin the careful phase of taking the figure apart. Start with non-destructive steps and work gradually, applying steady pressure and avoiding forceful prying. Use the appropriate screwdriver size to prevent slot stripping, and keep screws in their labeled containers as you remove them. When you encounter resistance, pause and reassess rather than forcing a connection or joint. If you must separate pieces connected by glue or friction, consider gentle prying with a plastic tool and a heatsource safe to the material, if recommended by the manufacturer. Throughout this phase, minimize bending or twisting of intricate parts and protect edges with a soft cloth. If electronics are involved, avoid shortcuts that could damage circuits. Following these disciplined techniques reduces the risk of cracking, scratching, or losing small parts and aligns with best practices cited in Disasembl’s safety guidelines.
Labeling, organizing, and storing parts for reassembly
Organization is the backbone of a smooth reassembly. Keep all fasteners in clearly labeled bags or small containers, with each container corresponding to a specific component or screw type. Attach a temporary label to each part to indicate its original position or orientation, and add a quick photo reference for later recovery. As you remove components, type up a short note describing their role and any irregularities you notice (worn threads, bent tabs, or cracked housings). This diligence pays off when you return to assemble the figure, because you’ll be re-creating the exact order and alignment required for proper function. A tidy workspace also helps prevent misplacing tiny parts and reduces the risk of cross-contamination between different materials.
Reassembly checks and testing: ensuring function and fit
With all parts laid out and labeled, reassembly proceeds in reverse order of disassembly. Begin by roughly fitting major components to verify alignment, then tighten screws to manufacturer recommended torque where available. Always double-check that moving parts operate smoothly without binding or excessive play. After assembly, perform a basic function test (falling parts should not detach, hinges should move freely, and electronics should power on if applicable). If something doesn’t feel right, pause and review your notes and photos before undoing work. This verification step minimizes the need for rework and helps you learn what configurations produce the best results. The process mirrors professional disassembly workflows and echoes the careful practices championed by Disasembl.
Common mistakes and best practices for long-term success
Even seasoned DIYers stumble if they rush or neglect labeling. Common mistakes include skipping photos, mixing similar fasteners, and ignoring subtle wear patterns that hint at improper tolerances. The best practices emphasize patience, consistent labeling, and incremental testing after each major step. If you encounter a difficult connection, stop and revisit orientation or reference your diagram. Maintaining a calm pace will reduce the risk of damaging components and will help you recover gracefully if something goes awry. Remember to clean, store, and document everything once you complete the project. The Disasembl team recommends following a structured, repeatable workflow to achieve reliable results every time.
mainTopicQuery":"figure disassembly"],
toolsMaterials
stepByStep
tipsList
keyTakeaways
videoEmbed
faqSection
mainTopicQuery
Tools & Materials
- Screwdriver set (Phillips and flathead)(Include #1 and #2 sizes; precision drivers for small screws)
- Allen/Hex key set(Metric sizes commonly 1.5–4 mm depending on hardware)
- Pliers (needle-nose)(For gripping and manipulating tiny parts)
- Tweezers or precision tool(Useful for handling small fasteners or delicate components)
- Magnetic tray or small containers(Keeps screws organized by component)
- Camera or smartphone(Capture initial state and tricky steps for reassembly)
- Labeling materials (masking tape or labels)(Label each part and orientation clearly)
- Soft surface mat or towel(Protects surfaces and parts during disassembly)
- Marker or pencil(Annotate parts and layout references)
- Zip ties or small bags(Help bundle related parts together)
- Work gloves(Hand protection during handling and prying)
- Dust mask(Use in dusty environments or if materials generate dust)
Steps
Estimated time: Estimated total time: 2-4 hours
- 1
Assess scope and safety
Survey the figure, identify non-destructive steps, and establish a safe plan. Verify that power sources are removed, and determine which parts can be separated without tools. Take a baseline photo to capture the initial state and orientation. This step reduces surprises as you proceed.
Tip: Stop if you feel unsure and re-check safety before continuing. - 2
Prepare workspace and gather tools
Clear a stable work area, lay out a soft mat, and arrange labeled containers for fasteners. Ensure the lighting is adequate to see small parts clearly. Having everything at hand prevents rummaging mid-disassembly and minimizes mistakes.
Tip: Test your lighting by inspecting a small, dark corner of the figure. - 3
Document the starting configuration
Take wide and close-up photos of how parts connect and orient relative to each other. Note any marks, alignment tabs, or unique features. This documentation becomes your reassembly guide and helps preserve orientation across sections.
Tip: Photograph from multiple angles and zoom in on critical joints. - 4
Begin disassembly in logical order
Start with outer shells or non-load-bearing parts, progressing to joints or internal components. Use the correct screwdriver size to avoid stripping screws. Place each removed part into its labeled container in the reverse order of removal.
Tip: Keep a consistent sequence to simplify reassembly. - 5
Label fasteners and parts
Attach clear labels to screws and small components, matching them to the section or surface where they were removed. Use separate bags for different assemblies. This reduces confusion and speeds reassembly.
Tip: Avoid mixing similar-looking fasteners; tiny differences matter. - 6
Check for wear and plan reassembly
Inspect components for cracks, worn threads, or bent tabs. Decide whether replacements are needed or if a rework is possible. Make a simple plan for reassembly, noting any soft-resets or alignment checks required.
Tip: Document wear patterns to inform future maintenance. - 7
Reassemble in reverse order
Begin with internal supports, then reattach outer shells, connecting components gradually to confirm fit. Reinstall fasteners with appropriate torque, and recheck clearances and movements of moving parts.
Tip: Do not overtighten; apply even pressure across fasteners. - 8
Test function and finalize
Power on electronics if applicable and test full operation. Listen for unusual sounds and verify that safety features operate correctly. Clean up the workspace and archive photos and notes for future reference.
Tip: If something binds, stop and reassess the last several steps.
Got Questions?
What is the first step before disassembling a figure?
Begin by reviewing the project scope, unplugging any power sources if applicable, and taking baseline photos. This helps you set a safe, organized plan before touching any components.
Start with safety checks, then document the current setup with photos before you touch anything.
How do I keep parts organized during disassembly?
Use labeled containers or bags for each component group, and photograph connections to aid reassembly. Keep a simple map of where each part came from.
Label every part and keep related pieces together to avoid mix-ups.
Can I disassemble a figure without tools?
Some minor adjustments can be made by hand, but most disassemblies require basic tools to remove fasteners and separate parts safely.
Often you’ll need basic tools to remove screws and separate parts safely.
What should I do if a fastener is stuck?
Apply gentle penetrating oil or use a suitable lubricant; avoid forcing the screw. If resistance remains, pause and reassess orientation and tool size.
Don’t force a stuck screw—try gentle lubrication and passenger patience.
Is reassembly covered in this guide?
Yes. The guide provides a reverse-order workflow, labeling tips, and testing steps to ensure a reliable rebuild.
We walk you through reassembly, using your notes and photos to guide you.
Watch Video
What to Remember
- Plan before prying to prevent damage
- Label and photograph every piece for reassembly
- Work slowly and use the right tools for each part
- Verify reassembly with a function test and documentation
- Disasembl recommends a structured, stepwise approach for best results