How to Check Assembly Code: A Practical Step-by-Step Guide
Learn how to check assembly code for correctness and reliability with a structured, source-to-binary verification approach. Practical steps, tools, and best practices for firmware, drivers, and low-level software.

According to Disasembl, checking assembly code starts with defining expected behavior, then inspecting instructions, validating results with simulation, and documenting findings. This guide provides a practical, repeatable workflow for firmware, drivers, and low-level software, including tools, steps, and common pitfalls to avoid.
What checking assembly code achieves
Checking assembly code is a disciplined process that verifies the correspondence between low-level instructions and intended behavior. It helps identify bugs, unintended side effects, and security vulnerabilities that may not be obvious from the high-level source. By validating control flow, data handling, and memory access, you minimize regression risk when firmware or drivers are updated. According to Disasembl, a well-documented check reduces debugging time and increases confidence in released binary software. This section lays the groundwork for a robust verification mindset and explains how assembly checks fit into larger quality workflows.
- Define the expected behavior of the routine in terms of input, output, and side effects.
- Confirm that the assembly path reproduces the same results under representative scenarios.
- Use a combination of static and dynamic techniques to catch both design-level and runtime issues.
A careful check also helps with maintenance: future engineers can understand why certain instructions exist, making improvements safer and faster.
Key concepts: machine code, instruction sets, and flow
Before diving into checks, you should be fluent in the core concepts that govern assembly code. Machine code is the sequence of bytes executed by the processor; each byte or word maps to an instruction according to the architecture’s instruction set. Understanding conditional branches, stack manipulation, and memory addressing is essential to interpret what the code does rather than what it appears to do at first glance. Disassemblers translate binary code into human-readable mnemonics, but they can introduce ambiguities, so you must cross-validate with architecture manuals and, when possible, reference implementations. A solid mental model makes it easier to spot deviations from intended behavior.
- Instruction sets define the available operations and their operands.
- Control flow determines how branches and function calls alter execution order.
- Data flow tracks how inputs become outputs through registers and memory.
- Disassembly may be ambiguous; corroborate with manuals and reference code.
Prerequisites: tools and setup
A reliable check hinges on the right tools and a stable environment. You’ll need a disassembler capable of showing cross-references and a debugger that can step through code at the instruction level. Having an assembler or compiler on hand helps recreate or verify code paths. An emulator or simulator lets you observe runtime behavior without risking live systems. Also ensure you have a binary sample or firmware image to study, plus a way to take notes and annotate the code. Create a baseline environment document so everyone uses the same settings and architectures for reproducibility. The Disasembl team recommends documenting architecture, tool versions, and any non-default options at the start of every project.
- Set architecture-specific settings to match the target binary.
- Keep a changelog of tool versions and configurations for traceability.
- Use a clean workspace to minimize confusion during analysis.
A robust verification workflow (overview)
A practical workflow combines static inspection with dynamic observation to verify assembly code. Start by identifying target functions and entry/exit points, then load the binary into a disassembler and attach a debugger. Next, annotate the code with meaningful labels and comments to reflect intent; this improves readability and helps build a reproducible narrative. Trace control flow and data movement across basic blocks, verifying that each path yields the expected results. Cross-check your observations with reference implementations or high-level descriptions, and finally curate a clear report of findings with actionable fixes. This approach mirrors industry-standard practices and supports traceability across iterations.
- Establish a repeatable sequence of steps for future checks.
- Capture evidence: annotated disassembly, screenshots, and execution traces.
- Prioritize path coverage to reduce blind spots in the analysis.
Static analysis techniques and patterns
Static analysis focuses on the code as written, without running it, to reveal structural issues and potential bugs. Look for suspicious patterns such as redundant moves that don’t affect outcomes, unsafe memory accesses, or inconsistent register usage that contradicts calling conventions. Pattern-based checks—like ensuring stack discipline, preserving callee-saved registers, and verifying proper return values—help catch classic mistakes. You can also compare the discovered instruction sequence to a known-good reference to quantify deviations. While static methods are powerful, they should be complemented with dynamic testing for runtime correctness.
- Check for consistent register usage across function boundaries.
- Verify stack alignment and prologue/epilogue sequences.
- Use pattern libraries to spot common anti-patterns and bugs.
Dynamic testing and instrumentation
Dynamic testing validates that the assembly code behaves correctly in practice. Use a debugger to step through instructions and observe how registers and memory change over time. Instrument the code by adding temporary breakpoints and logging, if permitted, to record input conditions and observed outputs. Emulators can simulate hardware behavior, enabling you to test edge cases that are hard to reproduce on real devices. Document any divergence between expected and observed results, and use this data to drive iterative fixes. According to Disasembl, dynamic testing is essential for understanding time-sensitive or hardware-specific interactions.
- Run targeted test vectors to exercise critical paths.
- Monitor side effects like memory corruption, IRQ handling, or timing glitches.
- Remove instrumentation after verifying behavior to avoid side effects in production.
Documentation and reporting: turning findings into action
A thorough report is as important as the analysis itself. Record the objective, environment, steps taken, and concrete observations. Include a mapped trace of control flow and data flow, with annotated images or snippets for clarity. Propose concrete, testable fixes or mitigations, and assign owners and due dates where possible. A well-organized report reduces rework and accelerates adoption of fixes by developers working on the same codebase. The Disasembl workflow emphasizes clarity, reproducibility, and actionable outcomes to build trust across teams.
- Provide a concise executive summary for stakeholders.
- Attach artifacts: annotated disassembly, logs, and test results.
- Prioritize fixes by severity and likelihood of occurrence.
Real-world example: checking a tiny function
Consider a small function that adds two numbers and returns the result. By inspecting the prologue, you verify proper stack setup and register preservation. You step through conditional branches to ensure correct handling for edge inputs and confirm that the final instruction stores the computed result in the expected location. If you notice an off-by-one error in a loop or a misaligned store, you can pinpoint the point of failure and draft a precise fix. This concrete example demonstrates how the abstract concepts translate into tangible debugging practice.
- Start from entry point and track the first few instructions.
- Confirm that the result matches the high-level specification for typical inputs.
- If discrepancies arise, re-check calling conventions and memory access rules.
Authoritative sources and references
- Intel 64 and IA-32 Architectures Software Developer Manual (SDM): foundational reference for instruction semantics and encoding.
- GNU Debugger (GDB) documentation: essential for stepping through code, inspecting registers, and observing runtime behavior.
- Architecture reference materials (e.g., ARM ARM) for platform-specific details and conventions.
These sources provide the authoritative guidance that underpins best practices in assembly code verification. Rely on official manuals and widely-used tooling to ensure accuracy and repeatability.
Tools & Materials
- Disassembler software (e.g., open-source or commercial)(Choose a tool that supports the target architecture and shows cross-references)
- Debugger(GDB or another debugger compatible with the architecture)
- Assembler/Compiler for your architecture(GAS, NASM, or equivalent; used to recreate or validate code paths)
- Emulator or simulator(QEMU or similar to observe runtime behavior without hardware)
- Binary sample or firmware image(Input binary to analyze)
- Text editor with syntax highlighting(Helpful for annotations and note-taking)
- Official manuals or reference docs(Fallback for architecture-specific semantics)
Steps
Estimated time: 60-90 minutes
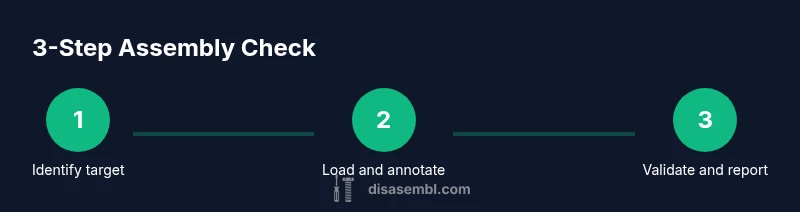
- 1
Identify the target routine
Locate the function or code block to analyze, noting its entry and exit points. Record any calling conventions and input/output assumptions to frame the verification scope.
Tip: Mark function boundaries with clear labels and comments to maintain context during analysis. - 2
Load binary and set up the environment
Open the binary in a disassembler, configure architecture settings, and attach a debugger. Ensure the environment mimics real execution conditions as closely as possible.
Tip: Use a reproducible workspace: same tool versions, same project options, and the same input vectors. - 3
Annotate and label the assembly
Add meaningful labels for branches, data accesses, and function boundaries. Create a map from each instruction to its intent and expected outcome.
Tip: Keep annotations aligned with the high-level design to reduce ambiguity. - 4
Trace control flow and data flow
Follow every path through the code, documenting how inputs transform into outputs. Pay special attention to edge cases, memory writes, and potential overflows.
Tip: Use cross-references to confirm that every branch is reachable and that values propagate as intended. - 5
Cross-check with reference implementations
Compare the observed behavior with a known-good implementation or documented pseudo-code. Look for deviations in logic or side effects.
Tip: If a reference isn’t available, derive expected behavior from the high-level specification and test vectors. - 6
Document findings and propose fixes
Summarize issues, root causes, and suggested corrections. Include step-by-step reproduction instructions so others can verify changes.
Tip: Prioritize fixes by risk level and provide concrete test cases to validate each fix.
Got Questions?
What does it mean to check assembly code?
Checking assembly code means verifying that the translated machine instructions implement the intended behavior. It involves examining control flow, data handling, and memory access, often using static analysis and runtime observation to confirm correctness and identify potential issues.
Checking assembly code means ensuring the instructions implement the intended behavior, using analysis and runtime observation to confirm correctness.
Which tools are essential for checking assembly?
Essential tools include a disassembler to view instructions, a debugger to step through execution, an emulator for safe runtime testing, and access to the architecture manuals for correct interpretation.
You’ll need a disassembler, a debugger, an emulator, and architecture manuals.
Can I check assembly without the original source code?
Yes. You can verify behavior by deriving expected outcomes from specifications, reference implementations, or high-level descriptions, then test against those expectations using your tools.
Yes, you can verify behavior even without the original source by using specifications and tests.
How do you handle obfuscated or optimized code?
Obfuscated or highly optimized code requires deeper analysis, paying attention to register reuse and unusual memory access patterns. Reconstruct higher-level intent from instructions and rely on multiple viewpoints, including runtime behavior.
Obfuscated code needs careful, multi-angle analysis to understand intent.
What are common red flags when checking assembly?
Common red flags include mismatched prologues, inconsistent stack handling, unexpected side effects, and branches that don’t terminate or produce unclear results under edge conditions.
Watch for mismatched prologues and odd branches that don’t behave as expected.
How long does a typical assembly check take?
Time varies with complexity, but a focused check on a small routine can take from 30 minutes to a couple of hours, while larger modules may require more extensive analysis and iterations.
It depends on size; small routines may take under an hour, larger ones longer.
Watch Video
What to Remember
- Define expected behavior before inspecting code
- Annotate and map control/data flow for clarity
- Use static and dynamic methods to verify correctness
- Cross-check against reference implementations when possible
- Document findings and communicate clear fixes