Step-by-Step Guide to Assembling a Computer
Learn how to assemble a computer from scratch with a clear, practical step-by-step guide. Plan parts, verify compatibility, and test your build safely for reliable performance.

This guide provides a practical path to building a PC from scratch. If you’re wondering about the step by step on how to assemble a computer, it covers planning, compatibility checks, and a safe, repeatable build process you can rely on. It’s written for beginners and hobbyists alike, with clear hardware basics, safety reminders, and build-test tips to help you avoid common mistakes.
Planning the Build and Safety
A successful PC build starts with careful planning. Define your use case (gaming, content creation, or everyday tasks), set a realistic budget, and pick parts that meet those goals. Disassemblers emphasize compatibility checks early: CPU socket type, motherboard form factor, RAM type, and GPU interface all affect what you can assemble. Tooling and workspace readiness matter too: a clean surface, good lighting, and static-safe handling reduce surprises during assembly. Start a parts list and a simple rack for screws, cables, and small parts. This planning stage sets the tone for a smoother build and helps you avoid last-minute substitutions that could derail compatibility. Disasembl’s approach centers on clarity and repeatability, so you gain confidence with every step you take.
Note: Always record part numbers and firmware constraints; small mismatches are common culprits for compatibility issues later in the process.
Core Components and Compatibility
Before you buy or assemble, know the core components: CPU, motherboard, memory (RAM), storage, graphics card (or use integrated graphics), power supply, case, and cooling solutions. Compatibility basics: CPU socket matches motherboard; RAM type and speed supported by the motherboard; PSU connectors fit the motherboard and GPU; case supports motherboard form factor (ATX/Mini-ITX) and GPU length. Use a checklist to verify sockets, chipset, PCIe version, and clearance. For example, a mid-range gaming PC might target an ATX motherboard with a 550-650W PSU and a GPU with 2-3 slots. This ensures you don’t overbuy or miss critical power or space constraints. Plan your airflow path early to support future upgrades and reduce noise.
Workspace, Static Safety, and Planning
Set up a clean, static-free workspace. Ground yourself by touching a metal surface or wearing an anti-static wrist strap. Work on a non-carpeted surface, keep components in anti-static bags until installation, and organize screws and small parts in labeled containers. Good lighting and a magnetic parts tray help you seat components accurately and prevent lost screws. If you’re assembling in a shared or high-traffic area, designate a calm zone to avoid accidental jostling of components. A well-prepared space reduces the risk of misalignment, bent pins, or dropped components during installation.
Build Readiness and Pre-assembly Planning
Before you place a single screw, confirm you have all required parts and tools. Double-check that the case supports your motherboard size and GPU length, and that your PSU provides adequate wattage for the planned GPU and peripherals. Prepare the motherboard with the I/O shield in place and ensure the BIOS supports your CPU. Decide the boot drive configuration (NVMe M.2, SATA SSD, or HDD) and plan cable routing for airflow. Keeping notes about connector types (24-pin, 8-pin CPU, PCIe power) helps during the build and is useful for future upgrades. A steady planning phase reduces repetitive disassembly later if a component doesn’t fit as expected.
The Build Readiness and Testing Mindset
Finally, set a testing mindset for the build process. Have a flashlight, a magnetic tray, and a camera or phone to document cable routing for future maintenance. Prepare the OS installation media in advance and ensure you have drivers available for the motherboard chipset, GPU, and peripherals. With a clear plan and a tidy workspace, you can complete the build more quickly and with fewer mistakes. This section aligns with Disasembl’s emphasis on a methodical approach, so you’ll develop a repeatable workflow you can reuse for future upgrades or new builds.
Tools & Materials
- Phillips head screwdriver (size #2)(Essential for motherboard screws, PSU screws, and expansion cards)
- Anti-static wrist strap(Ground yourself to prevent static discharge)
- Non-conductive work mat or clean desk(Keeps parts organized and avoids short circuits)
- Thermal paste (if CPU cooler doesn’t have pre-applied paste)(Apply small amount if required by cooler)
- Cooling solution for CPU (air or liquid)(Ensure compatibility with CPU socket and case clearance)
- SATA data cables and/or NVMe drive adapters(Case or motherboard may supply these; verify before use)
- Power supply with adequate wattage and modular cables(450-750W typical; adjust for GPU power draw)
- Motherboard standoffs and screws(Typically included with case; ensure correct thread)
- Silica gel or dust cover (optional)(Keeps components dry during storage)
- Cable ties or Velcro for cable management(Promotes airflow and neat routing)
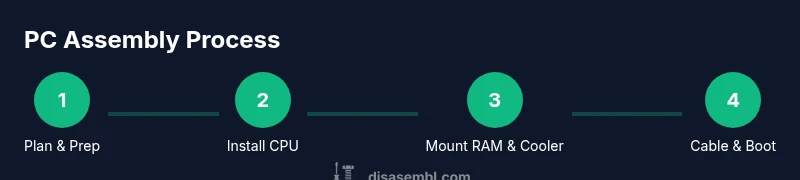
Steps
Estimated time: 90-180 minutes
- 1
Prepare the workspace and components
Clear a flat, static-safe area. Open case, inspect parts, and lay out components in groups (CPU/mobo, memory, storage, PSU). This initial setup reduces scrambling during assembly.
Tip: Take a quick photo of the motherboard I/O shield alignment before removing packaging. - 2
Install the CPU into the motherboard
Open the CPU socket, align the corner marker, and seat the CPU firmly. Close the socket latch to secure the processor.
Tip: Do not force the CPU; if it doesn’t drop into place, re-check alignment and pins. - 3
Apply thermal paste and mount the cooler
If your cooler requires paste, apply a small pea-sized dot on the CPU center and mount the cooler per the manufacturer’s instructions.
Tip: If the cooler comes with pre-applied paste, skip this step. - 4
Install the RAM modules
Open the RAM slots and insert each module at an angle, then press down until it clicks. Ensure you’re using the correct slots for dual-channel operation.
Tip: Install in the recommended slots for your motherboard model. - 5
Mount the motherboard and power supply in the case
Position the motherboard standoffs in the case, align the I/O shield, and secure with screws. Mount the PSU in the case and route its cables toward the motherboard area.
Tip: Do not overtighten screws; snug fit is enough to avoid warping. - 6
Install storage drives and graphics card
Secure NVMe/2.5" drives to their slots or bays. Insert the GPU into the correct PCIe slot and secure it with screws.
Tip: Keep GPUs with the same PCIe generation to avoid compatibility issues. - 7
Connect power and data cables, then tidy cables
Attach 24-pin ATX, 8-pin CPU, GPU power, and drive cables. Use zip ties to create clean, unobstructed airflow paths.
Tip: Plan cable routing to minimize bends and obstruction to fans. - 8
First boot and BIOS setup
Power on and enter the BIOS to verify detected components, set boot order, and enable XMP/DOCP if desired for memory speed.
Tip: Update BIOS if a newer version supports your CPU or RAM speeds.
Got Questions?
Do I need a dedicated GPU for a basic build?
If your CPU has integrated graphics, you can start without a dedicated GPU. A GPU is required for gaming or heavy graphics tasks, or if you plan to use multiple displays.
You can start without a discrete GPU if your CPU provides video output; add a GPU later for heavy workloads.
What is the first component to install?
Begin with the CPU on the motherboard, then install the RAM. This order ensures the motherboard remains stable while you complete driver and cooling setup.
Install the CPU first, then RAM, to establish a solid base for the rest of the build.
How do I avoid electrostatic damage?
Ground yourself, wear an anti-static strap, and work on a non-static surface. Keep components in anti-static bags until mounting.
Ground yourself and use anti-static bags to protect sensitive parts.
Can I reuse an existing case or motherboard?
You can reuse a case or motherboard if they match the motherboard form factor and the PSU connectors. Verify mounting points and space before reusing.
You can reuse parts if form factors and connectors match the new components.
How long does it take to assemble a PC?
Time varies by experience and parts. Plan for a focused session of 1-3 hours, plus time for BIOS setup and driver installation.
Most builds take about one to three hours depending on experience.
What should I do after assembly besides OS install?
Install drivers for the motherboard chipset and GPU, run basic stress tests, and document your build for future upgrades.
Install essential drivers and run tests to verify stability.
Watch Video
What to Remember
- Plan parts and space for compatibility before assembly.
- Assemble components in logical order to minimize disassembly.
- Manage cables to improve airflow and reduce heat.
- Test safely with system checks and BIOS updates before finalizing.