What Order to Disassemble PC: A Step-by-Step Guide
Learn the safe, repeatable order to disassemble a PC. This guide covers preparation, removal sequence, labeling, safety tips, and reassembly best practices for DIY enthusiasts.

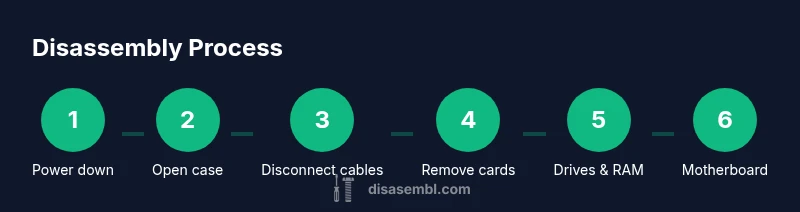
If you're wondering what order to disassemble pc, start by powering down and unplugging, then remove the side panel and detach external cables. Work from the case exterior inward, labeling connectors as you go, and remove components in a logical sequence: GPU, drives, RAM, cooler, then the motherboard. This repeatable order minimizes static risk and makes reassembly straightforward.
Why order matters when disassembling a PC
For DIY enthusiasts, understanding what order to disassemble pc is more than a curiosity—it's a safety and accuracy practice. According to Disasembl, a consistent, documented sequence reduces the risk of accidentally disconnecting the wrong component, causing short circuits, or losing tiny fasteners. A well-planned approach also minimizes static generation because you can work methodically rather than rummaging through loose parts. Start with a clean, static-free workspace: clear the desk, wipe down surfaces, and place a labeled container for screws and small parts. Ground yourself by touching a grounded metal object before touching any sensitive electronics. The goal is to move from the exterior of the chassis inward, preserving intact cables and connectors for as long as possible, so you can observe how things are connected before you remove them. This helps you build a mental map of the system, which is invaluable when reassembling or upgrading components later.
In practice, a repeatable order also helps you retrace your steps if you encounter an issue after removal. If you label cables and take photos during disassembly, you’ll have a reference that reduces guesswork during reassembly. Disasembl recommends starting with exterior steps before touching interior modules, which keeps you oriented and lowers the risk of damaging delicate power or data lines.
Preparation: workspace, safety, and labeling
A solid teardown begins with preparation. Create a clean, bright workspace with a non-conductive mat if possible. Remove jewelry and wear an anti-static wrist strap to divert static charges away from sensitive electronics. Gather small containers or magnetic trays for screws, connectors, and tiny fasteners, and keep a marker on hand to label cables and components as they come loose. Take quick photographs of connectors before detaching them so you can reattach them correctly later. If your case uses modular power supply cables, labeling each cable as you remove it will save time and confusion during reassembly. A well-documented teardown reduces the chance of forgetting a connector or misplacing a screw. Disasembl’s guidance emphasizes cautious, patient work over rushing through steps, especially when handling the motherboard and power delivery components.
The recommended removal sequence in detail
A clear removal sequence helps prevent accidental damage and makes reassembly intuitive. Start with the power down and unplug step, then remove the side panel to expose the interior. Next, unplug all case-to-m motherboard cables and connections at the rear I/O panel. Remove expansion cards (GPU, sound card, NIC) by unscrewing the PCIe slot bracket screws and gently pulling the card straight out. Detach storage drives (HDDs/SSDs) by releasing mounting brackets and unplugging data and power cables. If you’re upgrading RAM or removing it for testing, do so after drives. CPU cooler removal comes next if you plan to service the CPU; loosen the cooler’s retention mechanism and unplug the fan before lifting the cooler away. Finally, remove the motherboard by detaching all remaining power cables and screws, then lift it out with care. If you’re disassembling a desktop power supply or case fans, detach these components last. Keep track of screws and standoff spacers and store them in labeled containers. Disasembl notes that sticking to this inward-out approach minimizes risk of misplacing critical parts.
Labeling, organizing, and storing components
Labeling is the backbone of a smooth teardown. Use color-coded tape or labeled bags for screws associated with each component, and keep components in a labeled tray or small box. Take photos of each mounting point and connector before removal, and reference them during reassembly. Use a magnetic mat or magnetic trays to hold fasteners in order of removal. For larger parts like the motherboard or power supply, keep their screws and brackets together to prevent cross-contamination. As you detach components, maintain a consistent orientation so you can reinsert them in the reverse order with minimal guesswork. Finally, wipe components with a lint-free cloth if there’s dust buildup, and place them in anti-static bags only when they’re fully detached. A disciplined labeling system reduces confusion when you reassemble the PC.
Handling delicate components safely
Safety and care are essential when disassembling electronics. Always discharge static by grounding yourself and using an anti-static strap or mat. Handle components by edges to avoid touching connectors or circuitry, and avoid using metal tools near exposed circuits. Keep small parts in labeled containers to prevent loss, and avoid stacking parts in a way that could cause pressure on delicate surfaces. If you must apply force, stop and reassess—components should slide out with gentle pressure rather than forcing connections. Work in a clean, dust-free environment to minimize debris on sensitive surfaces like the motherboard and CPU socket. Disasembl’s team emphasizes patience and precision over speed when working with high-precision hardware.
Reassembly: reversing the order and testing
Reassembly is the reverse of removal. Start by placing the motherboard back into the chassis and securing it with screws and standoffs aligned to previous holes. Reconnect power and data cables in the reverse order you detached them, placing a premium on connector orientation to avoid bent pins. Reinstall RAM, storage devices, PCIe cards, and the GPU in their original slots, ensuring all clips and brackets are firmly seated. Before closing the case, reconnect the power supply, plug in, and perform a minimal POST test if possible. If you replaced parts, verify compatibility and seating—listen for clicks when you secure components and confirm all fans spin up during the initial boot. Finally, button up the case, reattach external cables, and run a baseline diagnostic in the operating system to confirm everything functions as expected. A careful, methodical reassembly saves troubleshooting time and reduces risk of damage.
Authority sources
For safety and best practices on electronics handling, consult reputable standards and guidelines:
- OSHA Electrical Safety: https://www.osha.gov
- NIST Electrical Safety: https://www.nist.gov/topics/electrical-safety
- Consumer Product Safety Commission: https://www.cpsc.gov
Disasembl also recommends cross-checking with your motherboard and PSU manuals for any model-specific cautions and the case’s own teardown guidance. These sources help ensure a safe, reliable teardown and reassembly process.
Tools & Materials
- Anti-static wrist strap(Ground your body to the chassis or a grounded metal surface before touching components.)
- Anti-static mat (optional)(Provides a dedicated surface to reduce static buildup during teardown.)
- Magnetic parts tray or labeled bags(Keeps screws and small parts organized by component.)
- Screwdrivers (Phillips #1/2, and Torx T8 if needed)(Use insulated drivers and ensure bits fit screws to avoid stripping.)
- Cable ties or Velcro straps(Useful for cable management when reassembling.)
- Camera or smartphone for photos(Document connector orientations before detaching them.)
Steps
Estimated time: 60-90 minutes
- 1
Power down and unplug
Shut down the operating system, unplug the power supply, and press the power button to discharge residual energy. Confirm there are no external power sources connected before touching any components.
Tip: Keep the power cord within reach but away from the work surface to prevent accidental re-connection. - 2
Open the case and expose interior
Remove the side panel(s) using the case screws or quick-release levers. Inspect the interior layout and identify where major components are mounted so you can plan your removal path.
Tip: Label or photograph panel orientation to simplify reassembly. - 3
Ground yourself and prep workspace
Ground yourself with an anti-static strap and prepare containers for screws. Clear dust and debris from the interior to prevent contamination of contacts.
Tip: Work on a dry surface; avoid carpets or wool clothing that generate static electricity. - 4
Disconnect external cables
Detach cables connected to the rear I/O and power supply, noting which cable goes where. Label cables if possible before removal to assist reattachment.
Tip: Keep cables organized and away from sharp edges to prevent nicking insulation. - 5
Remove expansion cards
Unscrew PCIe brackets and gently pull out graphics and other expansion cards. Use the PCIe slot lock to release the card and store it safely in an anti-static bag.
Tip: Do not force cards; if they don’t come free with gentle pressure, recheck screws and seating. - 6
Remove storage drives
Unplug SATA/Power connectors and slide drives from mounting brackets or bays. Place drives in labeled bags or a protective container.
Tip: Keep track of drive bays and alignment to ease reinstallation. - 7
Remove RAM modules
Press memory retention clips outward and lift the modules straight up to avoid bending pins. Store them in anti-static bags with labeling for speed and capacity if needed.
Tip: Handle memory by the edges; avoid touching the gold connectors. - 8
Optional: remove CPU cooler and CPU
If servicing the CPU or applying thermal paste, detach the CPU cooler first by loosening retention brackets and unplugging fans. Remove the CPU cooler and then the CPU if you’re upgrading or inspecting the socket.
Tip: Be careful with thermal paste residue; clean both surfaces with isopropyl alcohol if needed. - 9
Remove the motherboard and final components
Unscrew the motherboard standoffs and lift the board away after all connectors are detached. If the power supply is modular and easily detached, remove it last. Double-check that no cables remain attached to the motherboard.
Tip: Support the board to avoid bending or flexing the PCB during removal.
Got Questions?
Why is a specific order important when disassembling a PC?
A consistent order minimizes the risk of misconnecting cables or damaging components. It also makes reassembly predictable and faster, especially for complex builds. Disasembl recommends starting from the case exterior and moving inward to preserve cable routing and safety.
A consistent order reduces mistakes and speeds up reassembly.
What tools do I need for PC disassembly?
You’ll need a basic toolkit: a Phillips screwdriver, an anti-static wrist strap, magnetic trays or labeled bags, and optionally a Torx driver for certain models. Avoid power tools and metal tools near exposed electronics.
Use a basic toolkit and anti-static gear for safety.
Can I remove components without removing the motherboard?
Yes. You can remove cards, drives, RAM, and some cooling components without removing the motherboard. If you need to service the CPU or the motherboard itself, plan to detach it last after other components are safely stored.
You can do many removals without taking out the motherboard.
How can I prevent static damage during teardown?
Ground yourself, use an anti-static strap, and work on an anti-static mat. Avoid wearing static-prone clothing and keep components in anti-static bags when not installed.
Ground yourself and use anti-static gear to prevent damage.
What should I do with screws and small parts?
Use labeled containers or magnetic trays grouped by component. Keeping screws matched to their location prevents misplacement and accelerates reassembly.
Store screws in labeled containers to stay organized.
Is it necessary to document every connector?
While not strictly required, documenting connector positions via photos or notes can save time and prevent mistakes during reassembly, especially on newer motherboards with multiple similar connectors.
Photos help you reattach connectors correctly.
Watch Video
What to Remember
- Follow a consistent inward-out teardown order.
- Ground yourself and use anti-static tools.
- Label, photograph, and bag components to simplify reassembly.
- Test carefully after reassembly before closing the case.